How To Build an E-Commerce Application with ASP.NET 7 MVC and MSSQL Database? – Part 2
Table of Contents
Introduction
This post is built on my previous post here which shows the product page in an e-commerce application.
In this post, I shall enhance the application further to accord it the Cart functionality. The end product will have these features:
- Cart Page will show all the products.
- The Cart will also show picked up item prices and the total price of the Cart.
- Product page will allow picking up a product and adding to cart with an appropriate alert message.
- The page will also allow editing the quantity after adding to cart .
- The product page prevents multiple additions of the same product.
- Show Cart button on the products page, takes to the Cart page.
- On the Cart page you can review the cart and remove products.
- The Cart allows you to revisit the products page.
- The Cart allows editing the cart items with the updated item/quantity.
So, what are we waiting for? Let’s jump straight in and start with the code that we built here unless you’ve created your own code base following the part1
Create the Cart Model
Let’s now create a Cart model. So within Models folder add a class called Cart.cs (Fig 1)

Click Add to create the class with default template. Now paste the following code to the Cart model :
       public string Id {get; set;}
       public List<Item> Items {get; set;}
       public double TotalCost => Items.Sum(item => item.Cost); // Calculate the total cost based on the costs of all items

        public Cart ()
        {
            Items = new List<Item)();
        }
Now the application looks like the following (Fig 2)

Create an ICartService interface
We shall create an interface ICartService. It will be a contract for the CartService class. This class will be used later (Fig 3)

Paste the following code into the interface:
       void AddItem(Product product, int quantity);
        void RemoveItem(string productId);
        void ClearCart();
        Cart GetCart();
Our project in VS will look like this (Fig 4)

Create the CartService
Now we shall create the CartService class at the project root level (Fig 5):

We now replace the default code with the following code to the CartService class:
using ECommerceShoppingCartAppASPNET7.Data;
using ECommerceShoppingCartAppASPNET7.Models;
using Newtonsoft.Json;

namespace ECommerceShoppingCartAppASPNET7
{
    public class CartService : ICartService
    {
        private readonly IHttpContextAccessor? _httpContextAccessor;
        private readonly ProductContext _context;
        private Cart _cart = new Cart();

        public CartService(ProductContext context, IHttpContextAccessor httpContextAccessor)
        {
            _context = context;
            _httpContextAccessor = httpContextAccessor;

        }
        public Cart GetCart()
        {
            return _cart;
        }
        public void AddItem(Product product, int quantity)
        {
            var item = _cart.Items.FirstOrDefault(i => i.Product.Id == product.Id);

            if (item == null)
            {
                item = new Item { Product = product, Quantity = quantity };
                _cart.Items.Add(item);
            }
            else
            {
                item.Quantity += quantity;
            }
        }
       public void UpdateCart(Cart cart)
      {
         var cartJson = JsonConvert.SerializeObject(cart);
         _httpContextAccessor.HttpContext.Session.SetString("Cart", cartJson);
       }

        public void RemoveItem(string productId)
        {
            var cart = GetCart();
            var itemToRemove = cart.Items.FirstOrDefault(item => item.Product.Id == productId);

            if (itemToRemove != null)
            {
                cart.Items.Remove(itemToRemove);

            }
        }
        public void ClearCart()
        {
            _httpContextAccessor.HttpContext.Session.Remove("Cart");
        }


    }
}
Make a note of the UpdateCart method. This stores the serialized representation of the cart object in the user’s session.
Here’s a breakdown of what this method does:
_httpContextAccessor.HttpContextis an object that provides access to the current HTTP context, including the session.Sessionrepresents the user’s session, which is a mechanism to store data that persists across multiple requests.SetString("Cart", JsonConvert.SerializeObject(cart))is a method call on the session object that sets a string value associated with the key “Cart” in the session.- The first parameter, “Cart”, is the key that will be used to retrieve this value later.
- The second parameter,
JsonConvert.SerializeObject(cart), is the serialized JSON representation of thecartobject.JsonConvert.SerializeObject()is a method provided by the Newtonsoft.Json library. This converts an object into its JSON string representation.
We store the serialized cart object in the user’s session. It allows the application to retrieve and reconstruct the cart object in subsequent requests. This allows the cart information to persist across different pages and actions during the user’s session.
NOTE: The code for the CartService class is a starter code. In all likelihood this may need to be changed in order to bring along the various cart features as we move forward.
Accordingly, the project on Visual Studio will appear as below (partial screenshot as representative image) (Fig 6)

Register the CartService in Program class (Startup)
Next we register the CartService as follows:
builder.Services.AddHttpContextAccessor();
builder.Services.AddTransient<CartService>();
Dependency Inject CartService in the ProductsController
We shall dependency inject the CartService in the constructor of the ProductsController. Later we shall use it to retrieve the selected product quantities in the Index view as follows:
Step 1) We shall create a readonly object of CartService type. Then we inject it in the ProductsController constructor
private readonly CartService _cartService;
public ProductsController(ProductContext context, CartService cartService)
        {
            _context = context;
            _cartService = cartService;
        }
Step 2) Modify the Index action of the ProductsController to overwrite the existing code with the following:
var products = _context.Products.ToList();

            var cart = _cartService.GetCart();
            foreach (var item in cart.Items)
            {
                var product = products.FirstOrDefault(p => p.Id == item.Product.Id);
                if (product != null)
                {
                    product.Quantity = item.Quantity;
                }
            }

            return View(products);
In summary, this code fetches the products from the database, updates their quantities based on the cart items. The code snippet then passes the updated products to the view for rendering. The view includes their updated quantities from the cart.
Create a Cart Controller
Now we create a CartController in the Controllers folder. We then add the following code to the controller
public class CartController : Controller
{
    private readonly CartService _cartService;
    private readonly ProductContext _context;

    public CartController(CartService cartService, ProductContext context)
    {
        _cartService = cartService;
        _context = context;
    }

    public IActionResult Index()
    {
        var cart = _cartService.GetCart();
        return View(cart);
    }

    public async Task<IActionResult> Buy(string id)
    {
        var product = await _context.Products.FindAsync(id);

        if (product != null)
        {
            _cartService.AddItem(product, 1);
        }

        return RedirectToAction("Index", "Cart");
    }

    public IActionResult Remove(string id)
    {
        _cartService.RemoveItem(id);
        return RedirectToAction("Index", "Cart");
    }

    public IActionResult Clear()
    {
        _cartService.ClearCart();
        return RedirectToAction("Index", "Cart");
    }
}
Just like CartService class, this is just a skeleton code for the CartController to start with. We may have to add/edit it as we go along with the implementation of various desired features.
In the Visual Studio the CartController looks like (Fig 7) as a screenshot of partial view

Create the Cart View
Now we create a Cart folder within the Views folder. We now add an empty razor page for the Index view (Index.cshtml). We then add the following code to this Index page:
@model ECommerceShoppingCartAppASPNET7.Models.Cart

@{
    ViewData["Title"] = "Cart";
}

<h3>Cart</h3>

@if (Model.Items.Count > 0)
{
    <table class="table">
        <thead>
            <tr>
                <th>Product</th>
                <th>Quantity</th>
                <th>Price</th>
                <th>Cost</th>
            </tr>
        </thead>
        <tbody>
            @foreach (var item in Model.Items)
            {
                <tr>
                    <td>@item.Product.Name</td>
                    <td>@item.Quantity</td>
                    <td>@item.Product.Price</td>
                    <td>@(Math.Round(item.Cost, 2))</td> <!-- Display the cost -->
                    <td>
                        <form action="/Cart/Remove" method="post">
                            <input type="hidden" name="productId" value="@item.Product.Id" />
                            <button type="submit">Remove</button>
                        </form>
                    </td>
                </tr>
            }
        </tbody>
        <tfoot>
            <tr>
                <td colspan="3">Total Cost:</td>
                <td>@(Math.Round(Model.TotalCost, 2))</td> <!-- Display the total cost -->
            </tr>
        </tfoot>
    </table>

    <form asp-controller="Products" asp-action="Index" method="get">
        <button type="submit" class="btn btn-primary">
            Edit Products (Start Again)
        </button>
    </form>
}
else
{
    <p>Cart is empty.</p>
}


@section Scripts {
    <script src="~/js/cart.js"></script>
}
To make the above code work we have to modify the Item class. This Item class was created in the Part1 in the Models folder. We then add a Cost property to return the cost of an individual item in the cart (based on the price of the item and the selected quantity).
Modify the Item class (For adding a Cost property)
public double Cost
        {
            get { return (Product.Price) * Quantity; }
        }
The Item model now appears as below Fig. 8

Modify the Product class (Add a Quantity)
We shall now modify the Product class to add a property Quantity. Product class looks like :
public class Product
    {
        public string Id { get; set; }
        public string Name { get; set; }
        public double Price { get; set; }
        public string Photo { get; set; }
        public int Quantity { get; set; }

    }
The Visual Studio with this addition of the property Quantity in Product class looks like (Fig 9):

Modify the Products View
We add a quantity input for each product. This needs to be done to accommodate for the Quantity in the Products view.
So, update the product view (Views/Products/Index.cshtml) to include a quantity input and an “Add to Cart” button:
<td>
            <input type="number" min="1" value="1" id="quantity-@product.Id" />
</td>
The changed Products/Index.cshtml looks as below:
@model IEnumerable<ECommerceShoppingCartAppASPNET7.Models.Product>

@{
    ViewData["Title"] = "Products";
}

<h3>Products List</h3>
<table class="table">
    <thead>
        <tr>
            <th>
                @Html.DisplayNameFor(model => model.Id)
            </th>
            <th>
                @Html.DisplayNameFor(model => model.Name)
            </th>
            <th>
                @Html.DisplayNameFor(model => model.Price)
            </th>
            <th>
                @Html.DisplayNameFor(model => model.Photo)
            </th>
            <th>
                @Html.DisplayNameFor(model => model.Quantity)
            </th>
            <th></th>
        </tr>
    </thead>
    <tbody>
        @foreach (var product in Model)
        {
            <tr>
                <td>@product.Id</td>
                <td>@product.Name</td>
                <td>@(Math.Round(product.Price, 2))</td>
                <td><img src="~/images/@product.Photo" width="60" /></td>
                <td>
                    <input type="number" min="1" value="@product.Quantity" id="quantity-@product.Id" />
                </td>
                <td align="center">
                    <button class="add-to-cart" data-product-id="@product.Id">
                        Add to Cart
                    </button>
                </td>
            </tr>
        }
    </tbody>
</table>

<form asp-controller="Cart" asp-action="Index" method="get">
    <button type="submit" class="btn btn-primary">Show Cart</button>
</form>
The Products view also contains a Show Cart button. This button redirects to CartController and executes the Index action method on CartController with a Get verb.
Add JavaScript to handle Add to Cart Button Click
Add JavaScript to handle the “Add to Cart” button click.
In an ASP.NET Core MVC application, we typically place the JavaScript code within a separate JavaScript file and include it in the view.
Create a new JavaScript file, for example, cart.js, in the wwwroot/js folder.
Write the following code to the cart.js file
document.querySelectorAll('.add-to-cart').forEach(button => {
    button.addEventListener('click', async (event) => {
        const productId = event.target.dataset.productId;
        const quantityInput = document.getElementById(`quantity-${productId}`);
        const quantity = quantityInput.value;

        const response = await fetch(`/Cart/AddToCart`, {
            method: 'POST',
            headers: {
                'Content-Type': 'application/json'
            },
            body: JSON.stringify({ productId, quantity })
        });

        if (response.ok) {
            const cart = await response.json();
            if (cart.updated) {
                alert('Product quantity updated in cart');
            } else {
                alert('Product added to cart');
            }
        } else {
            alert('Failed to add product to cart');
        }
    });
});
Let’s understand the cart.js :
Let’s break down what this code does:
document.querySelectorAll('.add-to-cart')selects all elements in the document that have the class “add-to-cart”. This returns a NodeList..forEach(button => { ... })iterates over each element in the NodeList and attaches an event listener to it.button.addEventListener('click', async (event) => { ... })adds a click event listener to each button element. When the button is clicked, the code inside the listener function will be executed.const productId = event.target.dataset.productId;retrieves the value of the “productId” attribute from the clicked button using the dataset property. This assumes that the button has a “data-product-id” attribute defined.const quantityInput = document.getElementById(quantity-${productId});retrieves the quantity input element based on the productId.const quantity = quantityInput.value;retrieves the value of the quantity input.const response = await fetch(/Cart/AddToCart, { ... })sends a POST request to the “/Cart/AddToCart” endpoint, passing the productId and quantity as JSON data in the request body.- The response from the server is checked using
response.okto see if it was successful (status code 200-299). - If the response is successful,
const cart = await response.json();retrieves the JSON data from the response body, assuming it contains a “cart” object. - If
cart.updatedis true, it means the product quantity was updated in the cart and an alert is shown indicating that. - If
cart.updatedis false, it means the product was added to the cart and an alert is shown indicating that. - If the response is not successful, an alert is shown indicating that adding the product to the cart failed.
In summary, this code handles the click event of buttons with the class “add-to-cart”. The code sends a request to the server to add a product to the cart. It then displays appropriate alerts based on the response from the server.
Update the CartController to handle adding products with a specified quantity:
[HttpPost]
        public async Task<IActionResult> Add(string productId, int quantity)
        {
            var product = await _context.Products.FindAsync(productId);

            if (product != null)
            {
                _cartService.AddItem(product, quantity);
                return Ok();
            }

            return BadRequest();
        }
Create an AddToCartViewModel
We shall create an AddToCartViewModel in the Models folder with the following code:
namespace ECommerceShoppingCartAppASPNET7.Models
{
    public class AddToCartViewModel
    {
        public string ProductId { get; set; }
        public int Quantity { get; set; }
    }
}
The fetch statement sends a POST request to `/Cart/AddToCart` to get a response at point 7 above. Hence, we shall now add an action method to CartController with the name AddToCart and add the following code to the method:
 [HttpPost]
        public IActionResult AddToCart([FromBody] AddToCartViewModel model)
        {
            if (ModelState.IsValid)
            {
                var cart = _cartService.GetCart();

                // Check if the product already exists in the cart
                var existingItem = cart.Items.FirstOrDefault(item => item.Product.Id == model.ProductId);
                if (existingItem != null)
                {
                    // Update the quantity of the existing item
                    existingItem.Quantity = model.Quantity;
                    _cartService.UpdateCart(cart);

                    // Return a JSON response with the updated flag
                    return Json(new { updated = true });
                }

                // The product is not in the cart, add it
                _cartService.AddToCart(model.ProductId, model.Quantity);
                _cartService.UpdateCart(cart);

                // Return a JSON response with the updated flag set to false
                return Json(new { updated = false });
            }

            // Model validation failed, return a BadRequest response
            return BadRequest();
        }
Add a Script Section in Products View
In order to load the JavaScript code we add the following script section at the bottom of the Pages/Index.cshtml page
@section Scripts {
    <script src="~/js/cart.js"></script>
}
Add TotalCost property in Cart model
We now add a TotalCost property in the Cart model class that calculates the total cost based on the costs of all items using the lambda expression as follows:
public double TotalCost => Items.Sum(item => item.Cost);
The complete code of Cart class is as shown in Fig 10 below:

Configure Session Support in the Application
We shall now add the following lines to our Program class to configure the session support properly and add the session middleware as follows
builder.Services.AddDistributedMemoryCache();
builder.Services.AddSession(options =>
{
    options.Cookie.HttpOnly = true;
    options.Cookie.IsEssential = true;
});
app.UseSession();//Session Middleware
Edit Product View (To Show Cart)
We now paste the following markup just above the script section to show the cart
<form asp-controller="Cart" asp-action="Index" method="get">
    <button type="submit" class="btn btn-primary">Show Cart</button>
</form>
Update Cart.js to Handle Remove Button Click
Add the following code at the end of the JavaScript file Cart.js to handle remove button clicks
document.addEventListener("DOMContentLoaded", () => {
    const removeButtons = document.querySelectorAll(".remove-from-cart");
    removeButtons.forEach((button) => {
        button.addEventListener("click", async (event) => {
            event.preventDefault();
            const productId = event.target.closest("tr").dataset.productId;
            const response = await fetch(`/cart/remove?productId=${productId}`, {
                method: "POST"
            });
            if (response.ok) {
                // Refresh the page or update the DOM dynamically
                location.reload();
            } else {
                alert("Failed to remove product from cart.");
            }
        });
    });
});
Edit RemoveItem method in CartController
Now that we have the remove section added in the JavaScript file (cart.js) which uses productId(instead of Id), the Remove action method that takes the Product Id also needs to be modified. Change the existing code for the Remove action method with the following code
public IActionResult Remove(string productId)
        {
            _cartService.RemoveItem(productId);
            return RedirectToAction("Index", "Cart");
        }
Create UpdateCartInSession method
We now create the UpdateCartInSession method in CartService with the following code
private void UpdateCartInSession()
        {
            _httpContextAccessor.HttpContext.Session.SetString("Cart", JsonConvert.SerializeObject(_cart));
        }
Edit AddItem method
Call the above UpdateCartInSession method at the end of the AddItem method in CartService so that it looks as follows:
public void AddItem(Product product, int quantity)
        {

            var item = _cart.Items.FirstOrDefault(i => i.Product.Id == product.Id);

            if (item == null)
            {
                item = new Item { Product = product, Quantity = quantity };
                _cart.Items.Add(item);
            }
            else
            {
                item.Quantity += quantity;
            }

           // _cart.CalculateItemCosts();
            UpdateCartInSession();
        }
Create GetCartFromSession method
We now create the GetCartFromSession method in CartService with the following code
private Cart GetCartFromSession()
        {
            var cartJson = _httpContextAccessor.HttpContext.Session.GetString("Cart");

            if (!string.IsNullOrEmpty(cartJson))
            {
                return JsonConvert.DeserializeObject<Cart>(cartJson);
            }

            var cart = new Cart();
            _httpContextAccessor.HttpContext.Session.SetString("Cart", JsonConvert.SerializeObject(cart));
            return cart;
        }
In summary, this method retrieves the cart from the user’s session if it exists, or creates a new cart if it doesn’t, and ensures that the cart is stored in the session for future access.
Now initialize the cart object, in the constructor of CartService so that the modified CartService constructor is:
     public CartService(ProductContext context, IHttpContextAccessor httpContextAccessor)
        {
            _context = context;
            _httpContextAccessor = httpContextAccessor;
            _cart = GetCartFromSession();

        }
Create SaveCartToSession method
We now create the SaveCartToSession method in CartService with the following code:
        private void SaveCartToSession(Cart cart)
        {
            var cartJson = JsonConvert.SerializeObject(cart);
            _httpContextAccessor.HttpContext.Session.SetString("Cart", cartJson);
        }
This method serializes the cart object and stores it in the session with a key “Cart” and a value as the string representation of the serialized Cart.
Edit Remove method in CartService
To save the removed cart item back to the session, we call UpdateCartInSession method at the end of the Remove method whose code looks as below
public void RemoveItem(string productId)
        {
            var cart = GetCart();
            var itemToRemove = cart.Items.FirstOrDefault(item => item.Product.Id == productId);

            if (itemToRemove != null)
            {
                cart.Items.Remove(itemToRemove);
                //_cart.CalculateItemCosts(); // Recalculate item costs
                UpdateCartInSession();
            }


        }
The Remove method works by checking if any item matching the producId exists in the database. If the product exists, the item is removed. The cart is updated for the session.
Edit UpdateCart method
We now modify the UpdateCart method in CartService by replacing the existing code with the following:
_cart = cart;
 SaveCartToSession(_cart);
This edited method now serializes the Cart object as a JSON string and sets this as the value for the key “Cart”
Make Product as Default View
At this stage, all the changes have been made. However, there is a small change for our convenience in navigation that we can make in the Program file (Startup class). This is such that the product view loads when the application is run (F5 or CTRL + F5)
Accordingly the MapControllerRoute parameter is modified and it looks as follows:
app.MapControllerRoute(
    name: "default",
    pattern: "{controller=Products}/{action=Index}/{id?}");
Run the Application
With all these changes, when we run the application we get the following screenshot (Fig 11):

Select any flower quantity and click Add to Cart button. An appropriate alert “Product added to cart” appears (Fig 12)
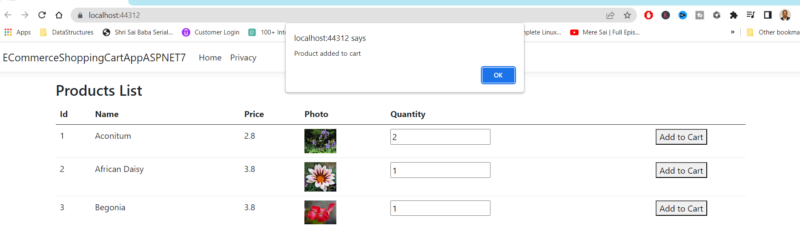
Click the Add to Cart button again (with or without changing the quantity) for the same product. Now the screenshot (Fig 13) appears with the alert “Product quantity updated in cart”

On clicking Show Cart button, the cart appears as below (Fig 14). This shows with individual cart products cost. The total cost of all items picked in the cart is shown too

Clicking on remove button to remove a product removes the product (Fig 15)

If we click Edit Products (Start Again) button below

We are routed back to the Products view again which remembers our cart selection and gives a chance to edit any item, add new items (Fig 17)
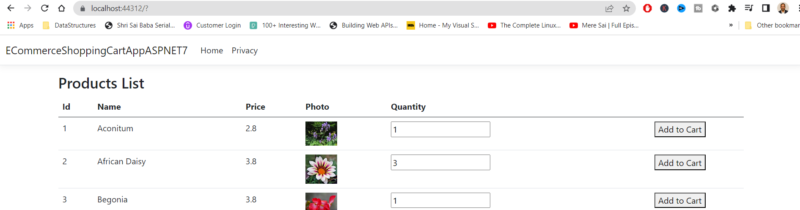
We can edit or stay with out earlier cart as we wish. We can view the cart again repeating the same process.
Is it not Amazing display of all the cart functionalities in an e-commerce application.
Happy Codiing !
Source Code
Complete GitHub source code at (Look for Part 2)
Follow Me Here