OpenAI Image Integration in Blazor
In my previous blog I wrote a detailed step by step guide on how to use open ai api key in a Blazor WASM project, to generate text in response to a prompt.
In this post, I will take that Visual Studio solution a step further and use the same api key with an image endpoint (DALL-E) to generate cool and stunning images from text prompts. I will use the same service class but add another component in the Pages folder to generate images. Cool isn’t it!
So.. Let’s get started!
Add a method for generating the image:
In the OpenAIService class, let’s add a method “GenerateImageAsync” and write the method with the following code:
public async Task<List<string>> GenerateImageAsync(string prompt)
{
    var requestBody = new
    {
        prompt = prompt,
        n = 3, // Number of images
        size = "512x512"
    };

    var requestContent = new StringContent(JsonSerializer.Serialize(requestBody), Encoding.UTF8, "application/json");
    requestContent.Headers.ContentType = new MediaTypeHeaderValue("application/json");

    _httpClient.DefaultRequestHeaders.Authorization = new AuthenticationHeaderValue("Bearer", _apiKey);

    var response = await _httpClient.PostAsync("https://api.openai.com/v1/images/generations", requestContent);

    if (response.IsSuccessStatusCode)
    {
        var json = await response.Content.ReadFromJsonAsync<JsonElement>();

        if (json.TryGetProperty("data", out var dataArray) && dataArray.ValueKind == JsonValueKind.Array)
        {
            var imageUrls = dataArray.EnumerateArray()
                                     .Select(img => img.GetProperty("url").GetString())
                                     .Where(url => !string.IsNullOrEmpty(url))
                                     .ToList();

            return imageUrls; // Return list of image URLs
        }
        else
        {
            throw new Exception("API response does not contain expected 'data' array.");
        }
    }
    else
    {
        var errorMessage = await response.Content.ReadAsStringAsync();
        throw new Exception($"OpenAI API Error: {errorMessage}");
    }
}
The explanation of the code above is as follows:
public async Task<List<string>> GenerateImageAsync(string prompt)
• Purpose: This method generates images based on a given prompt using the OpenAI API.
• Return Type: Task> – An asynchronous task that returns a list of image URLs.
Request Body
var requestBody = new
{
    prompt = prompt,
    n = 3, // Number of images
    size = "512x512"
};
• requestBody: An anonymous object containing the prompt, the number of images to generate (n), and the size of the images (size).
Request Content
var requestContent = new StringContent(JsonSerializer.Serialize(requestBody), Encoding.UTF8, "application/json");
requestContent.Headers.ContentType = new MediaTypeHeaderValue("application/json");
• requestContent: Serializes the requestBody to JSON and sets the content type to application/json.
Authorization Header
_httpClient.DefaultRequestHeaders.Authorization = new AuthenticationHeaderValue("Bearer", _apiKey);
Sending the Request
var response = await _httpClient.PostAsync("https://api.openai.com/v1/images/generations", requestContent);
• response: Sends a POST request to the OpenAI API endpoint for image generation.
Handling the Response
if (response.IsSuccessStatusCode)
{
    var json = await response.Content.ReadFromJsonAsync<JsonElement>();

    if (json.TryGetProperty("data", out var dataArray) && dataArray.ValueKind == JsonValueKind.Array)
    {
        var imageUrls = dataArray.EnumerateArray()
                                 .Select(img => img.GetProperty("url").GetString())
                                 .Where(url => !string.IsNullOrEmpty(url))
                                 .ToList();

        return imageUrls; // Return list of image URLs
    }
    else
    {
        throw new Exception("API response does not contain expected 'data' array.");
    }
}
else
{
    var errorMessage = await response.Content.ReadAsStringAsync();
    throw new Exception($"OpenAI API Error: {errorMessage}");
}
• Success Case:
• Checks if the response status is successful.
• Parses the JSON response.
• Extracts the data array containing image URLs.
• Converts the URLs to a list and returns it.
Error Handling:
• If the response is not successful, reads the error message and throws an exception with the error details.
Summary
The GenerateImageAsync method sends a request to the OpenAI API to generate images based on a prompt. It handles the response by extracting image URLs and returning them as a list. If an error occurs, it throws an exception with the error message.
We now add an ImageGenerator.razor component in the Pages folder as below:

Now copy the code below to write over the existing code in the new razor component:
@page "/image-generator"
@inject OpenAIBlazorApp.Services.OpenAIService OpenAIService

<h3>AI Image Generator</h3>

<input @bind="userPrompt" placeholder="Enter a prompt..." />
<button @onclick="GenerateImage" disabled="@isLoading">Generate Image</button>

@if (isLoading)
{
    <p><strong>Creating the image...</strong></p>
}

@if (imageUrls != null && imageUrls.Any() && !isLoading)
{
    <div>
        @foreach (var url in imageUrls)
        {
            <img src="@url" alt="Generated Image"  />
        }
    </div>
}

@code {
    private string userPrompt = "";
    private List<string> imageUrls = new List<string>();
    private bool isLoading = false;

    private async Task GenerateImage()
    {
        if (string.IsNullOrWhiteSpace(userPrompt))
            return;

        isLoading = true;  // Show "Creating the image..."
        imageUrls.Clear(); // Clear any previously generated images
        StateHasChanged(); // Force UI refresh

        // Request image generation from OpenAI service
        try
        {
            imageUrls = await OpenAIService.GenerateImageAsync(userPrompt);
        }
        catch (Exception ex)
        {
            Console.WriteLine($"Error: {ex.Message}");
        }
        // Clear the prompt input after generating the image
        userPrompt = "";

        isLoading = false; // Hide loading text
    }
}
Change the NavMenu.razor within the Layout folder:
Within the div class @NavMenuCssClass we add a navigation menu for the image generator as follows:
<div class="@NavMenuCssClass nav-scrollable" @onclick="ToggleNavMenu">
   <nav class="nav flex-column">
     <div class="nav-item px-3">
       <NavLink class="nav-link" href="image-generator">
         <span class="bi bi-plus-square-fill-nav-menu" aria-hidden="true"></span>Image Generator
      </NavLink>
    </div>

   </nav>
</div>
Run the application
Click Ctrl+F5 to run the application and navigate to Image Generator as follows:

Click the Generate Image button to see the output images (3 in No,.)
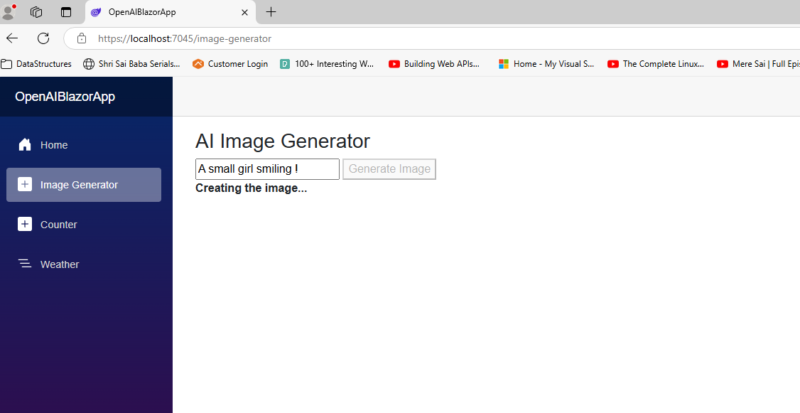
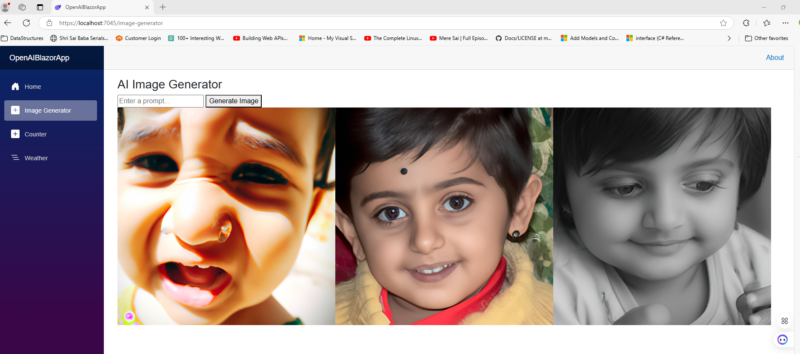
Off course the left most image is not accurate (looks like acrying face of a girl) but since this is just a basic application (without any sort of filter or refinements added unlike the professional products)
Follow Me Here